What’s a man to do with too much cream?
Freeze it of course!
One of the many benefits of restaurant work, is wastage. Not so much from a business perspective, but on a personal note, it’s great! This week it was 1.2 litres of cream that I needed a use for. The first thing that came to mind? Ice cream!.
The catch? Nobody on Earth owns an ice cream machine.
Luckily, I’m obsessive enough to spend days researching and developing a recipe in order to avoid buying expensive pieces of specified equipment. As it happens, its not the machine, but the crystals, that produces the best ice cream. The smaller the ice crystals formed, the smoother the ice cream, and the further from ice your ice cream will be.
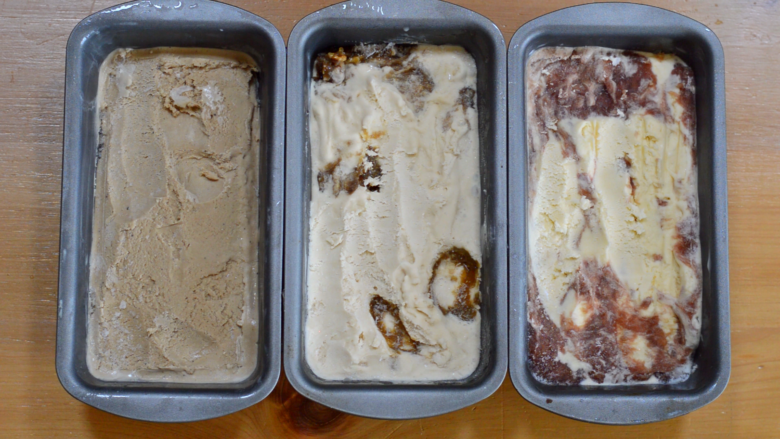
So that’s my goal. Three tubs, three flavour. This is machine-less home ice cream, in just a few hours.
Click below for the full recipe and techniques
Befor you start, you’ll need to place two metal baking tins in the freezer. One with a large surface area to freeze the custard (a baking or cookie tray will do), and a smaller, high sided one to store the ice cream later on (a tub or a loaf tin ideally).
Make sure that you can easily slide the tins in and out of the freezer flat, without having to angle them or anything (don’t want custard all over the freezer)
For all three flavours of ice cream, the ingredient ratios used were:
- 1:2:4, sugar, milk and cream
- 1 yolk per 100g of cream
Preparing your flavourings
The first step in producing great ice cream is using great flavours. Steeping the milk extracts the maximum amount of flavour from our ingredients.
Bring your measured flavours together in a container.
As a rule of thumb, for every 200g of milk, I use 1 to 2 tbsp of a given flavouring, depending on the strength of flavour I want.
For example, for the Poblado coffee and cardamom ice cream, I wanted the coffee to shine, with cardamom as a background flavour, and so I went with:
- 2 tbsp of Poblado coffee (ground)
- 1 tbs of cardamom, pods crushed open
For the rhubarb ripple and rosemary ice cream (where rhubarb, the defining flavour, would whole later on)
- 1 tbs rosemary
For the banana nut caramel ice cream (with the banana flavour coming from a syrup primarily)
- 2 tbs of banana syrup (from the Microwave Banana Bread recipe)
- 1 tbs of vanilla extract
Following this, you can make any flavour you like. Try 2 tbsp of coco powder, or maybe strawberry syrup (from some macerated strawberries).
Warm the milk until simmering ( microwave ~ 2 mins)
- 200g milk (full fat preferably)
Pour the warm milk over your flavourings and let them steep (30 mins)
The milk will take on the flavour of our aromatics, allowing the solids to be sieved out later.
As the milk steeps, prepare the remaining ingredients.
Preparing the cream
With no machine to churn our ice cream, we need an alternative method of incorporating air into our ice cream. By whipping the cream, we make up for this by incorporating air beforehand.
Measure the cream into a large bowl
- 400g double cream
Whisk the cream until soft peaks form. ( ~ 1-2 mins with an electric whisk )
It’s easy to over-whip your cream here. As soon as the cream thickens, start whisking by hand until the cream forms soft peaks (not stiff ones, we don’t want whipped cream).
With the cream whipped and milk steeped, go on and make the custard.
Making the custard (ice cream base)
At it’s simplest, ice cream is a frozen custard. It’s a popular base due to it being rich in fat, sugar, protein and emulsiphiers, all of which make for good ice cream:
Protein – Coagulate upon heating to form a complex protein mesh, trapping and inhibiting free movement of water molecules.
Fat – Long chain molecules that physically obstruct water, reducing the probability that two molecules collide.
Emulsifiers – Two headed molecules that bond water to fat, preventing them from bonding with each other.
Sugar– Hygroscopic molecules such as sucrose, glucose and fructose that attract water molecules to themselves, away from each other.
The purpous of all this water oppression? By obstructing water’s movement wherever possible, we prevent them from organizing on a mass scale. Without organization, there’s no crystallization which by definition means no ice, in the ice cream.
All thanks to a ton of yolk and sugar
For more on this, seriouseats has a great article that dives into what the perfect yolk to cream ratio should be.
Measure and whisk together your yolks and sugars ( < 1 min )
- 4 yolks
- 100g sugar (caster or granulated)
- 1 tbs honey (or other syrup)
Strain the steeped milk through a fine sieve over the yolk mixture.
- 200g llefrith wedi’ fwydo â blasyddion
Gently warm the mixture in a saucepan to around 80°C / 160°F ( ~ 10 munud )
Be sure to constantly stir the mixture whilst heating (especially once you hit 60°C and higher). The stirring will help keep the custard’s temperature constant, without curdling parts of the mixture.
Pass the custard through a sieve once more.
You’ll know you have a custard when a finger passed through the mix on the back of a spoon leaves a distinct trail. Sieving afterward simply ensures no curdled egg makes it through to the final product…not that you’d ever curdle anything of course 😛
Chill the custard
It’s important to chill the custard so that the mix is already cool once it goes in for the final freeze. This will minimize the time it takes to freeze
Mix the custard and cream until smooth ( 2 mins )
- cream whipped to soft peaks
- custad, chilled
With everything combined, we can move on to freezing the mixture.
Freezing the ice cream
The final factor for in creating smooth ice cream is the freezing time. The faster we freeze our mix, the smaller the crystals that form and the better the ice cream. Without a machine to churn the mix as it freezes, this is the true challenge for the home ice cream maker. As is usually the case however, I have a life-hack.
By freezing your trays beforehand, and chilling your custard, you give the ice cream the best possible chance of a rapid freeze. The theory is that the metal tray will conduct heat away from the ice cream mix much faster than by convection to the air in the freezer. The tray’s wide, flat bottom will also be in direct contact with the freezer shelf, maximizing the rate of heat transfer.
Lastly, we’ll be removing the ice cream trays from the freezer ever 20 mins to agitate the mixture. I’ll do this by scraping down the tray with a bench scraper spreading it flat again, like plastering a wall. This will evenly redistribute heat throughout the mix, giving an even freeze and allowing is to break up any large clusters of ice that start forming.
Remove the large baking sheet from the freezer and pour the mixture into it
- xture
- Wide baking sheet from the freezer
Place the filled baking sheet back in the freezer. (20 mins)
Remove the sheet from the freezer, scrape down the mixture and spread it out evenly once mixed.
Repeat the above steps in 20 minute intervals until the ice cream’s nearly set.
The ice cream will be ready when firm but still pliable (soft scoop texture).
When ice cream is ready, take the mixture and press it into the second chilled tin (loaf tin)
This is the point at which you should add any additional, solid flavourings such as whole strawberries, banana, or even stewed rhubarb. Alternate between layers of ice cream and flavouring in order to produce a ripple effect when you scoop it out later on.
- Nearly frozen ice cream
- High sided tin (loaf tin) from the freezer
Place the filled loaf tin back in the freezer and let the ice cream set fully ( no less that 4 hrs )
More to Read
That’s DIY ice cream for you then. No machine necessary, just some trays, patients and a lot of eggs! For details of how I made the toppings in the video, check out our banana nut caramel recipe. If you’re simply looking for a way of using your surplus of egg whites though, check out out Italian Meringue recipe, which should sort your problem, or for something more cerebral, head over to the Lab for the ongoing Angel Food Experiment which aims to make the perfect flour-less cake, all based on egg whites.